

PTD 2 Walkthrough: 1 vs 1 Mode: Levels 4, 5 & 6
Level 4
With my money, I most definitely bought a Pikachu because, well, it’s a Pikachu and Ash has one, and this is all the justification I need. I highly recommend purchasing at least one Pikachu for use in the next battle, since its attacks are strong, and you go up against a Pidgey in the next battle; Pikachu’s super-effectiveness against flying Pokémon becomes apparent here. If you have any money remaining, you should buy some potions too since the battles are becoming more difficult with every level you reach. At this stage, you can also purchase Antidote (to cure poison), Rare Candy 2/3 (increasing your Pokémon’s level by one with each use; each Rare Candy can only be purchased and use once, so you may wish to put in some thought as to which Pokémon would benefit the most from its powers, ahem Caterpie) and Parlyz Heal (curing your Pokémon’s paralysis).
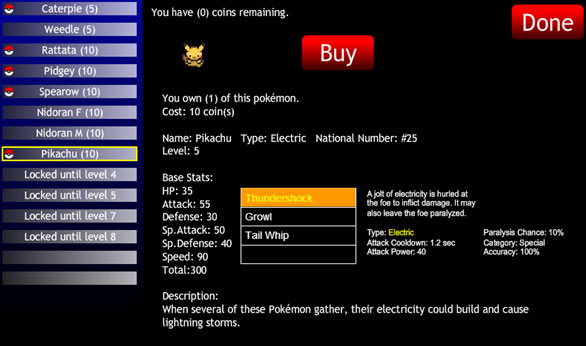
Figure 6: Pika Pika
Once stocked up, line up your Pokémon and continue to the next battle. I find a mix of ground, flying and electric does the trick at level four due to the variety of Pokémon you will be facing. Your team at this stage should consist of at least two Rattatas, a Pikachu and a Metapod, with the optional Pidgey/Spearow, depending which tactics you have decided to employ. All these Pokémon should be at level 5 but every one of them will be encompassing the spirit and vigour of level 10 Pokémon (aside from Metapod, who is level 7 at this stage).
Whilst wandering alone in the woods, you happen upon a girl who is doing exactly the same thing; a chance encounter like this in Pokémon world can only mean one thing, and it requires Pokémon to facilitate it. That’s right, you are up against a strange girl and you may just win a kiss if you beat her (apparently).
Her first Pokémon is a level 6 Rattata and shouldn’t be too much trouble to handle. I sent out Metapod immediately, using the opportunity to feed him a Rare Candy in order to push him into the exclusive club that only accepts Pokémon at level 8. If you do not wish to use Metapod, or do not own him at this stage, then Pidgey or Spearow can just as easily win this battle. Spearow can use the ‘Leer’ move to lower Rattata’s defences and Peck to deal the actual damage. Without too much of a fuss, Rattata should fall.
Pidgey is the next Pokémon you face, and it is also a level 6. This is where Pikachu comes in handy because of his effectiveness against the flying kind: retract Metapod (or whichever Pokémon you are using) from the battle and without a second though send out Pikachu. Without the need for any other attacks (though I did use Tail Whip for a little defence-lowering), Pikachu’s Thundershock makes extremely light work of Pidgey in spite of my particular brand of Pikachu being one level lower.
The third Pokémon to worry about is actually a Pikachu as well: at this stage you should recall your Pikachu because Pokémon of the same types (and particularly Pokémon who are exactly the same) are very ineffective against one another unless there is a dramatic difference in level. Due to having three Rattatas, I sent one of them out since in these quantities they are expendable (all is fair in love and Pokémon). Quickly using Tail Whip followed by repeated Quick Attacks will result in a fairly quick victory over Pikachu, and if your Rattata should fall, you always others waiting in your back pocket (check your coat pocket if you can’t find them).
Spearow is up next and I’ll be honest, I kept Rattata out and kept pummelling away with Quick Attack; remarkably, this seemed to do the trick and Spearow’s health dwindled fantastically. Of course, you can always bring Pikachu back into play if you want to be a true Pokémon tactician, using the super-effective Thundershock to put an end to Spearow’s flight: this is entirely up to you. However you make it happen, put an end to Spearow’s antics and prepare for her next Pokémon.
Up next is a Nidoran at level 7, which I wore down significantly with my flying Pokémon, requiring the sacrifice of both of them in order to prevail. After the death of my Pidgey and Spearow, I used Rattata to finish the job.
The final Pokémon is another Nidoran at level 7 yet again. My entire hopes were funnelled into Rattata, whose combination of tail whip and quick attack proves to be effective most of the time: this occasion was no exception. I do not recommend using Pikachu against Nidoran because if the relative ineffectiveness of electric moves against the Poison Pokémon. Again, the use of tail whip and quick attack should be sufficient to get you through; if it isn’t, you can extend your Pokémon’s life with a potion and victory should be yours through sheer longevity of your Rattata (or other chosen Pokémon).
Again, this is a round that can be won by a mixture of tactics (use of Pikachu against Pidgey) and brute force (strength in numbers). After this round it may be time think about levelling up your Pokémon with rare candy and always carrying at least one Potion with you into battle. This will ensure that you have the advantage going into the next battle because the levels of the Pokémon you face seem to be increasing with each level you complete.
Level 5
As a result of facing your toughest battle yet, you are rewarded with the mighty Diglett, who would be a welcome addition to your collection at the rock-bottom price of ten Poképounds. Rare Candy 4 is also now available to you and is even cheaper than a Pokéon at five units of Pokémon currency Your next challenge is nothing less than an extremely tough Gym Battle, and you are going to need all the support you can get: I suggest you stock up on items such as Rare Candy and Potion and strengthen your team with Diglett since the next battle cannot be won through sheer force of numbers alone.
Right, I’m not going to embellish the truth in any way here: You are now in for a battle at Pewter City gym, and the true Pokémon fans among you will recognise that gym battles are always extremely difficult and often encompass a variety of Pokémon types. This selection of Pokémon is usually designed to test the skills and awareness of Pokémon types and the different moves which they possess. As you begin and some light fighting talk is exchanged between you and Luigi (the gym owner/trainer), he attempts to intimidate you by going on about his Diglett’s ‘Arena Trap’ ability, which if used, will disallow you from switching your Pokémon or calling them back while Diglett is still in battle. I assure you that he will use this ability, if only to make your life (or at least the following two minutes of the battle) that little bit more difficult, so I strongly recommend that you make sure your first Pokémon selection is adequate enough to make a significant dent in Diglett’s health.
Figure 7: Diglett Win

Figure 8: Luigi
With this above advice in mind, prepare your Pokémon team for the battle. At this stage, your Pokémon collection could consist of a Metapod, two Digletts, two Rattatas and a Pidgey, all at a humble level 5 aside from Metapod who is a level 8. Again, it is possible to vary your Pokémon team and stand just as much of a chance at winning, but since this is my guide I intend to give you an account of my Pokémon selection at this stage. If you funds are sufficient, I recommend that you purchase some Potions which are almost essential for the battle (I managed to win without them but it was by a margin far finer than my nervous temperament could handle). A rare candy here and there can’t hurt either; use this to level up whichever Pokémon you feel deserves it, but it pays to spend time concentrating on building up a single Pokémon, using most of the limited Rare Candy available on it and watching it grow accordingly.
Luigi only has two Pokémon, Diglett and Sandshrew but these are at levels ten and eleven respectively, so they are tough opponents, and with most of my Pokémon at level 5, you can see why my battle with him was such a struggle. When he releases Diglett, it uses the ‘Arena Trap’ move, though this should make little actual difference to your battle. I began with Metapod and instantly used Rare Candy for a lovely bit of levelling up. You could also start with one of your Rattatas, alternating between tail whip and quick attack; Diglett’s health proves difficult to reduce I think we are all ok with Rattata being sacrificed for the cause. If you used Metapod, rotate through all his attacks, ensuring ‘Harden’ is your staple move between your attacks.
I managed to defeat Diglett using only Metapod in the end, but you can just as easily use one of your other Pokémon in order to whittle his health away further and finish him off. Pidgey can also be very effective here (flying Pokémon are traditionally quite effective against ground types).
At a mighty level 11, Luigi’s Sandshrew is even more difficult to defeat, being extremely sturdy and well-defended. This Pokémon’s health seems to take forever to weaken, but victory is still possible! I brought my second Diglett back into play, cycling between all of his attacks; due to their similar types, the attacks are less than effective and Diglett was defeated fairly quickly. I cycled through my remaining Pokémon and all their attacks to chip away at Sandshrew, but it was Rattata’s classic combination of tail whip and quick attack which proved most effective. With nearly all my Pokémon defeated and Rattata hanging on by the diameter of a rat’s tail, Sandshrew fell and the battle was over. Aren’t you glad you purchased the Potions now?
Level 6
Geodude is your reward for beating Luigi, but don’t get carried away by snapping him up just yet. Just when you are convinced that you have reached the owner of the gym and therefore the safe haven of a checkpoint, you (or at least I) come to the realisation that this is not the case. Your next opponent is also very, very difficult and also signifies the culmination of all of your previous efforts of levelling up Caterpie into Metapod.
This next trainer has two Geodudes and will prove difficult, if not impossible to beat if you have not taken heed of my advice and ploughed all of your efforts into developing Caterpie into a Pokémon that is actually useful to you. All your effort is about to pay off; if you didn’t manage to follow my advice, then I suggest a hefty amount of Potions and a significant quantity of praying. Buy Rare Candy 5 and however many Potions you can afford and proceed into battle.
As the battle begins, send forth Metapod into the fray and immediately use Rare Candy 5. After some more dramatic proceedings, his evolution will take place and you will now be in possession of an extremely useful Butterfree. If all goes well, then it will be very unlikely that you will need any Pokémon besides this one to emerge victorious, with a possible mid-battle potion application deeming itself necessary if your health gets too low. Cycle through all of Butterfree’s moves; you will find Confusion to be extremely effective and Harden will allow you to maintain your health for considerably longer than any of your other Pokémon. I found that even cycling between these two moves only can lead to victory.
Use Potion if necessary, and if you should be unfortunate enough to get to the stage where Butterfree faints, then simply sent out Rattata and cycle through his attacks. Even though it takes a while, you will be able to do more damage than any other Pokémon could in this situation; all other Pokémon prove themselves to be extremely ineffective against Geodude. If all went well, then you should emerge victorious; if not, then I suggest you try again and perhaps invest more heavily in Potions and the ability to follow some simple yet effective advice. You should now understand why I recommended such heavy investment into Caterpie, since he just carried you through level 6. After the battle is over, the trainer concedes and makes a reference to Brock (of the original Pokémon games for those of you that are unfamiliar); you may view this allusion in the screenshot below.
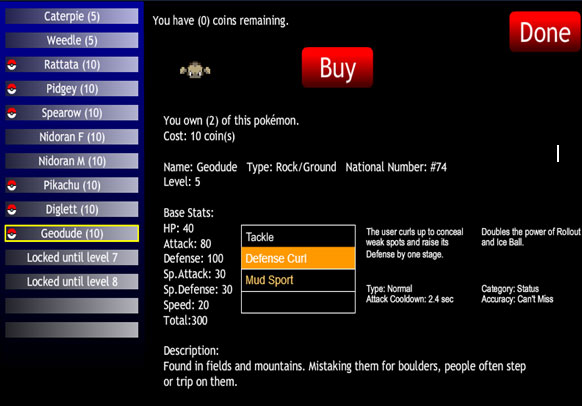
Figure 9: Dude, we've unlocked Geodude
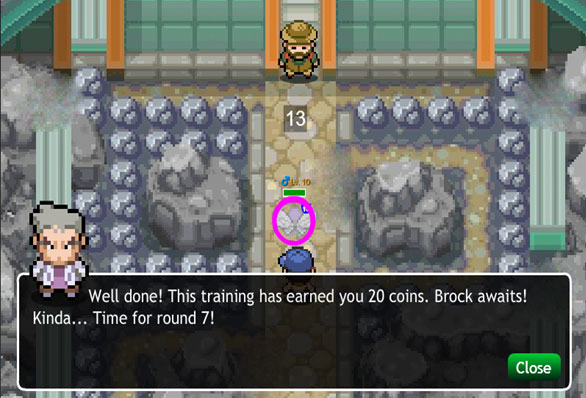
Figure 10: Brock Awaits
Back to 1 vs 1 Mode: Levels 1, 2 & 3 | Go to 1 vs 1 Mode: Levels 7 & 8