

PTD 2 Walkthrough: Story Mode: Falkner, High Flyers and the Benefits of Rock Pokemon
Having exchanged some very mild words and light battle talk with the gym leader (I haven’t seen his name in the game but the reliable source that is the internet internet in general, you begin the battle. Like the battle with the legendary birds, your first ‘Gym Battle’ actually takes place in the wonderful outdoors, which is a perfect environment for Falkner to show off his extremely high-level flying Pókemon. The reason why I asked you to capture and train two Geodudes to a minimum of level twelve is because Falkner’s first Pokémon is a level 25 Pidgeotto and his second is a Pigeot at an astounding level 30; since I haven’t encountered any electric Pokémon thus far I feel that rock Pokémon offer the best level of defence and you cannot really argue with the powerful ‘Rock Throw’ move which will have the battle won in no time at all.
Falkner starts with his level 25 Pidgeotto against which you are unlikely to stand a chance with low-level Pokémon that you may or may not have managed to capture and train to a high level. Even your starting Pokémon is unlikely to offer you much of an advantage. As Pidgeotto is released, take a few seconds to drag out your Geodudes into the battle arena; anywhere will do for now since I just want you to see the arrangement of the active zones in which you can place your Pokémon in order to get a feel for this battle.
Pidgeotto appears on the far right of the battle zone which is three squares high and four squares long, hovering in line with the middle square. Its only attack is ‘Gust’ which you must avoid at all costs if you are to survive the battle with him, let alone Pidgeot who is up next. It is imperative that when you see the miniature tornado that indicates his use of ‘Gust’ emanating from Pidgeotto, you must move whichever Geodude is in the firing line out of this square and into the other one which (by process of elimination) is safe. The tiny tornado moves fairly quickly, meaning you only have a short window of time to identify the direction in which the tornado is travelling so that you can move the particular Geodude that is in danger away from the attack, placing him back into attacking range as soon as it is safe. You should be able to continue in this way until Pidgeotto has fainted.
The tactic here is to set up your two Geodudes in any two of the three active zones that are in his immediate vicinity and set them to ‘Rock Throw’ as their only attack. You will find that this chips away at his health fairly quickly and provided that you have managed to avoid Pidgeotto’s gust manoeuvre, you should have no trouble in making fairly short work of this first avian annoyance.
A light yet consistent stream of smaller, low-level Pidgeys will be flying around the battle arena while the action unfolds; these can be taken out with a single hit from the ‘Rock Throw’ by quickly positioning one of your Geodudes near them. Once these smaller Pokémon are dealt with, ensure that you return your Geodude to within Pigdeotto’s vicinity in order to keep chipping away at his health. It won’t be long before Pidgeotto faints, leaving only a single Pidgeot at level thirty to content with.
After a small period of time in which the low-level Pidgeys swarm in and hover around with a death wish, Pidgeot is released at the opposite (left) side of the screen, being positioned in line with the middle square of the three vertical ones yet again. It is now more important than ever to avoid Pidgeot’s ‘Gust’ move, because this special attack from such a high-level Pokémon is quite deadly even to your highly-defended and sturdy Geodudes.
The procedure here is almost identical to your battle on the right side of the screen; the only variable is Pidgeot’s level and the number of gusts which he releases at any one time. Pigdeot releases three gusts simultaneously which travel laterally from left to right, forcing you to move both of your Geodudes out of their path. I recommend that you simply move them one square to the right while the tornados sweep across the nearest attacking zones; then you can simply place your Geodudes back into their attacking position in order to keep chipping away at Pigdeot. Alternatively, you can move them into attacking range of any smaller birds that may be hovering around in order to mop them up before they begin to accumulate, though make sure that if you do this you are sure to keep an eye on Pidgeot’s gusts: one encounter with this move and you are likely to be dead or very nearly so.
Luckily, Pidgeot’s triple gust travels at a much more relaxed pace than Pigeotto’s one, effectively giving you more time to pull your active Pokémon out of the danger zone. As long as you are aware of your Pokémon’s locations throughout the battle, you should encounter very few problems during the whole ordeal. In order to make the battle move a little more swiftly, you can make use of Geodude’s ‘Rock Polish’ move which, when used consecutively or on multiple separate occasions throughout the battle, raises the attack speed of Geodude quite substantially. When all is said and done, this battle is 50% having the right Pokémon, 40% evasion, 5% attack choice and the remaining 5% is pure, unadulterated patience. Proceed with these above tactics and the battle should be over in no time at all.

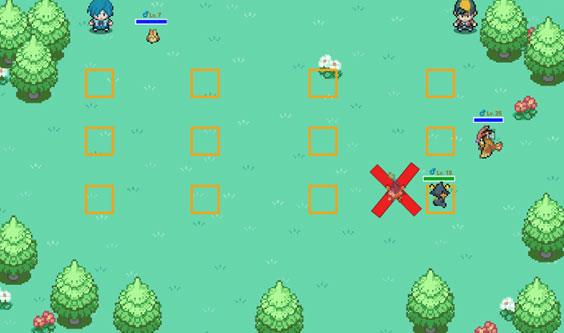
Pidgeotto proves to be a simple nemesis should you possess two Geodudes with the Rock Throw move (left). Pidgeot’s triple gust proves more difficult to avoid but is by no means an impossible feat; constant manoeuvring and consistent attack is the key to victory (right).
Having beaten Falkner, you can see why having two Geodudes was such an advantage; without ‘Rock Throw’, the battle would have taken more time in which it is likely that any other Pókemon you had would have been worn down by the smaller Pokémon ‘s attacks. This gym battle is as far as you can progress within the game at this stage of development. More musings on Story Mode strategy will follow Sam’s next update.
Back to Dark Cave | Continue on to Violet City & Falkner Revisited